
Something I’ve noticed recently when testing our Windows 10 IPU process is that a number of devices are failing the pre-cache compatibility scan with a hard block error due to an Intel Display Audio driver issue.
The problem is documented here by Microsoft and is warning about excessive processor usage and reduced battery life from v1809 onwards if you have a specific range of driver versions for the Intel Audio device.
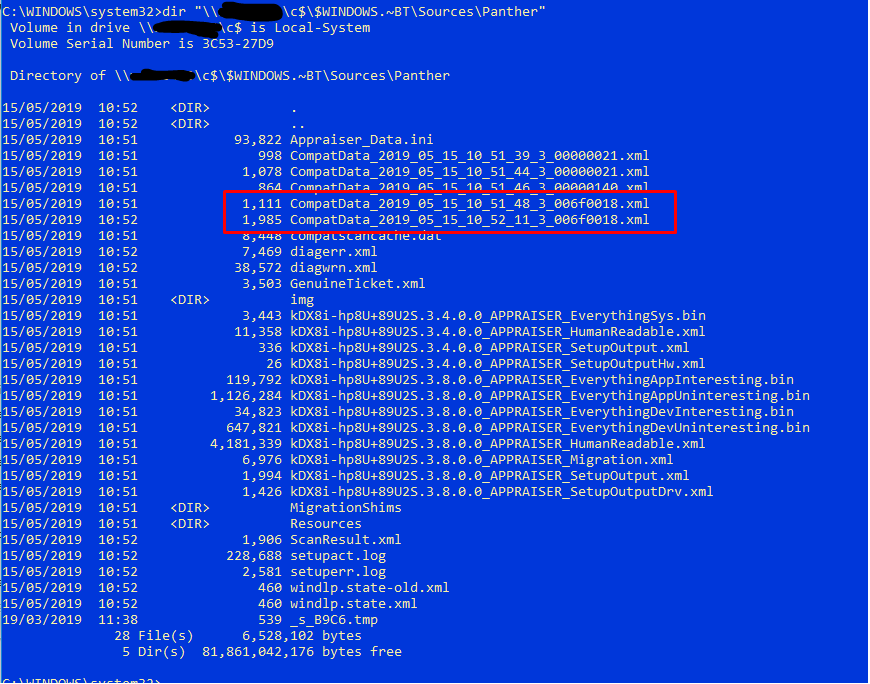
The compatibility scan fails with a rather generic error code which isn’t very helpful but if you look in a specific CompatData XML file as highlighted below that ends up in the “$WINDOWS.~BT\Sources\Panther” folder, you will see the follower warning which cause the compatibility scan to fail.
and

Since our client estate is rather varied, I decided the easiest way to identify all the potentially affected devices would be to create a ConfigMgr Configuration Item (CI) and Baseline (CB) which would then auto report into a Collection so I can see what needs fixing with a driver package deployment.
Configuration Baselines are a rather powerful feature of ConfigMgr and are seriously underused in our environment. Anyway, in case you haven’t set one up before this is what I did. It might not be the best or perfect method but it’s fairly quick and works well.
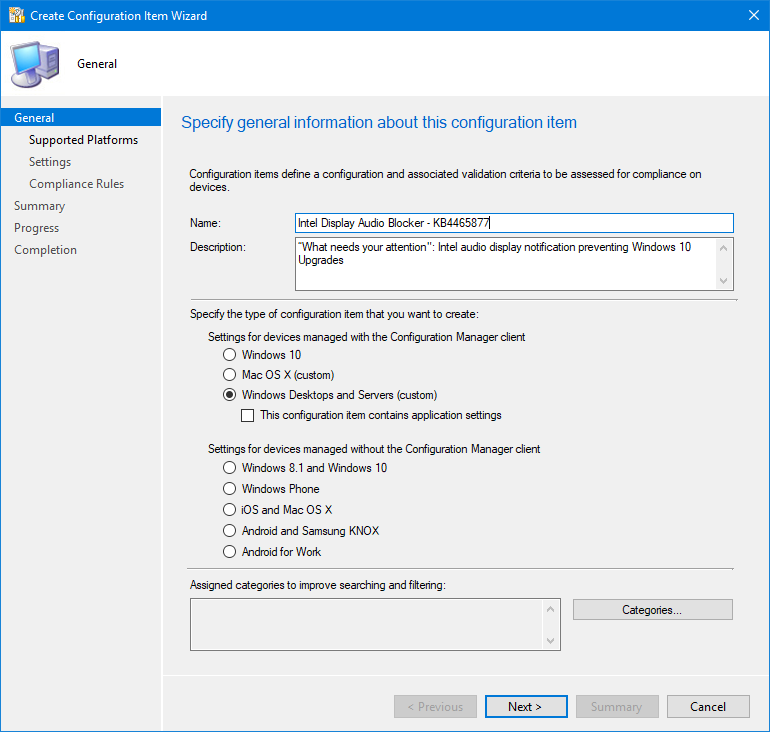
From the ConfigMgr console, navigate to the “Assets and Compliance” panel and in the “Compliance Settings” folder right click on the “Configuration Items” and create a new one.
Give it a relevant name and description if you like. Make sure the check box is set for “Windows Desktops and Servers” but don’t select the application settings checkbox.
On the next page select what Operating Systems you are checking against, in this case Windows 10 only

On the next page, click New setting and give it a name. Make sure you select Script and Boolean in the options underneath.
Now click Add Script and add the following code.
$DriverVersion = Get-WmiObject Win32_PnPSignedDriver | select devicename, driverversion | where {$_.devicename -like "Intel(R) Display Audio"}
If ($DriverVersion -eq $null)
   { Return $True }
else
   {
   if ($DriverVersion.driverversion -like '10.26.0.6')
      { Return $True }
elseif ($DriverVersion.driverversion -in '10.25.0.3','10.25.0.4','10.25.0.5','10.25.0.6','10.25.0.7','10.25.0.8')
       { Return $False }
else
   { Return $True }
   }
If the script doesn’t find the specific driver then the device is compliant so return True. Also I know that the updated driver I’m intending to deploy as the fix is version 10.26.0.6 so if it finds that specific version I’m also compliant so return True. If it finds any of the versions that Intel have identified as an issue then it returns False meaning the device is not compliant. Any other driver version is not affected so the device is compliant in that case as well so return True.
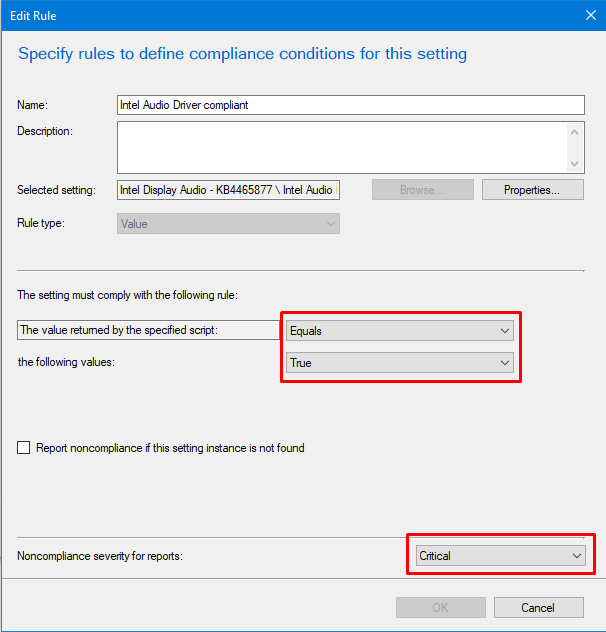
Save the script and move onto the next page to set the compliance rule. Click New to create the rule, give it name and Browse for your setting you just created. Make sure the settings are as shown and that a noncompliance severity is Critical.
Complete the Wizard to save the CI.
Now you need to create a Configuration Baseline to assign this to and then deploy to a collection to evaluate.
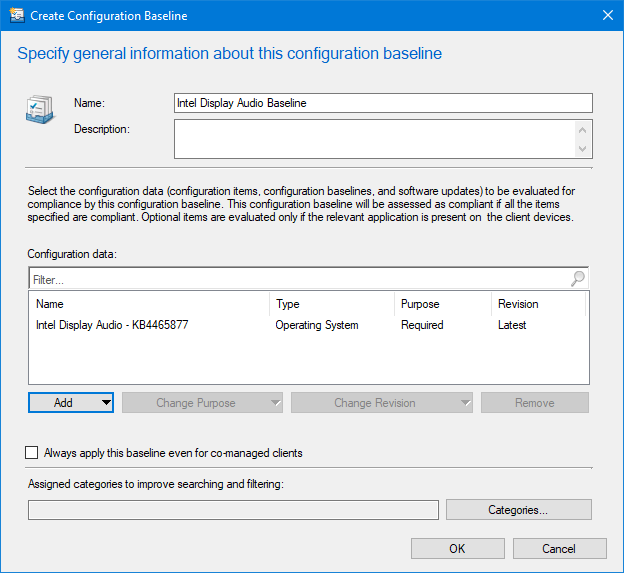
So in the Configuration Baselines section, create a new Configuration Baseline. You can, in theory add the new CI to an existing baseline if you need but I like to keep them separate.
So give it a meaningful name and click the Add button to find and select your newly created CI, click Add again and OK.
click OK to save the Baseline. Now you need to deploy it to a collection.
Right Click and select Deploy, it will auto select everything and all you need to do is pick the collection to deploy to and how often to run the compliance check.
Now, the interesting bit is that once you have created the Deployment you can direct the result of this straight into new Collections!
Select the Deployment from the Configuration Baseline, right click and drill down to create a new collection for non-compliance. It will run the new collection wizard for you with everything pre-defined so all you need to do if change the name, if you want, and complete the wizard.
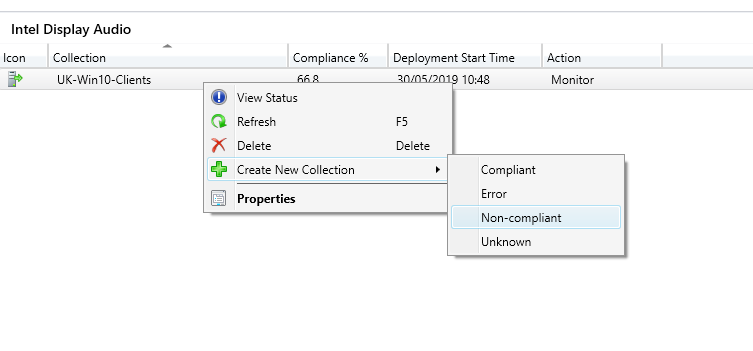
The newly created collection gets created in the root of the Device Collections folder so you can move it to wherever you need. Once the collection evaluation has run you will see what needs your attention.
I have created an additional collection from the deployment for all compliant devices and copied the non-compliant one so I can use it to test deployments of the driver upgrade package without impacting all devices whilst I test it.
Once testing is complete, I will advertise the driver upgrade package to the “Noncompliant” collection so they will all get updated.
I hope this has been a useful insight into a identifying a Windows 10 upgrade blocker and how you can leverage ConfigMgr to assist with rectifying the problem.